Showing posts with label Improvements. Show all posts

Thursday, April 12, 2012

Ron's great handiwork

Please hang in there folks...I am down in a deep valley and Internet service is spotty at best.  I'll be on the road tomorrow and should be getting better service.
Now to show you the great things Ron did for me.....


First of all, this table had a base that had to be set up in front of those drawers.  When it was in place the drawers could not be opened and the table took up all the space between the bunks so everything felt too crowded.  It was also very cumbersome to put up and take down.  So Ron removed all the underneath hardware, I put one of those rubber gripper sheets on the top of the drawers and the table top sits there just fine plus it doesn't feel like it takes up the whole place.  I simply slip the table top under the mattress on one of the bunks to store it. (and I am working on it right now)


I needed some place to hang wet towels at night to dry.  In this high-humidity climate I have had to be very very careful not to put away anything wet.  Mildew will develop fast and be miserable if not impossible to live with. At first we thought of a clothes line but that meant putting hooks into the bulkhead which is mostly padding so we were stumped until Pat Davis suggested a shower spring rod.  It works perfectly and can be quickly taken down and stored at night.


Sigh Me has one very annoying habit I cannot seem to break--she sharpens her claws.  I would never have her de-clawed on the off-chance she might desert this rocking ship some day--sans claws she would not survive in the great outdoors.  I found this box of stuff at Pet Smart that cats are supposed to love and will leap on obediently to sharpen their claws.  The first time Sigh Me saw it on the floor she curled up on top and went to sleep.  So I covered it with catnip.  She curled up on it and slept for the entire day.  So Ron suggested Velcro-ing it to the cabinet door.  So far she just looks at it then strolls over to the passenger seat and sharpens away.  So, for now I am covering everything in sheets and hoping she will give in to my wishes...yeah, right.


Wow, Ron got the TV antenna hooked up and showed me how to channel it into the computer.  So now I can watch 'Dancing with the Stars'!  Suddenly, I knew why I have lived for 7 months without TV. It stinks!  I know there are some good things on TV and I'll let you know the minute I find one of them.

And he gave me another table.  This one is on a hinge right behind the sink.  The post that holds it up can be removed and the table is hinged so it will drop down flat against the bulkhead when not in use.  It is a great place to set things when cooking.


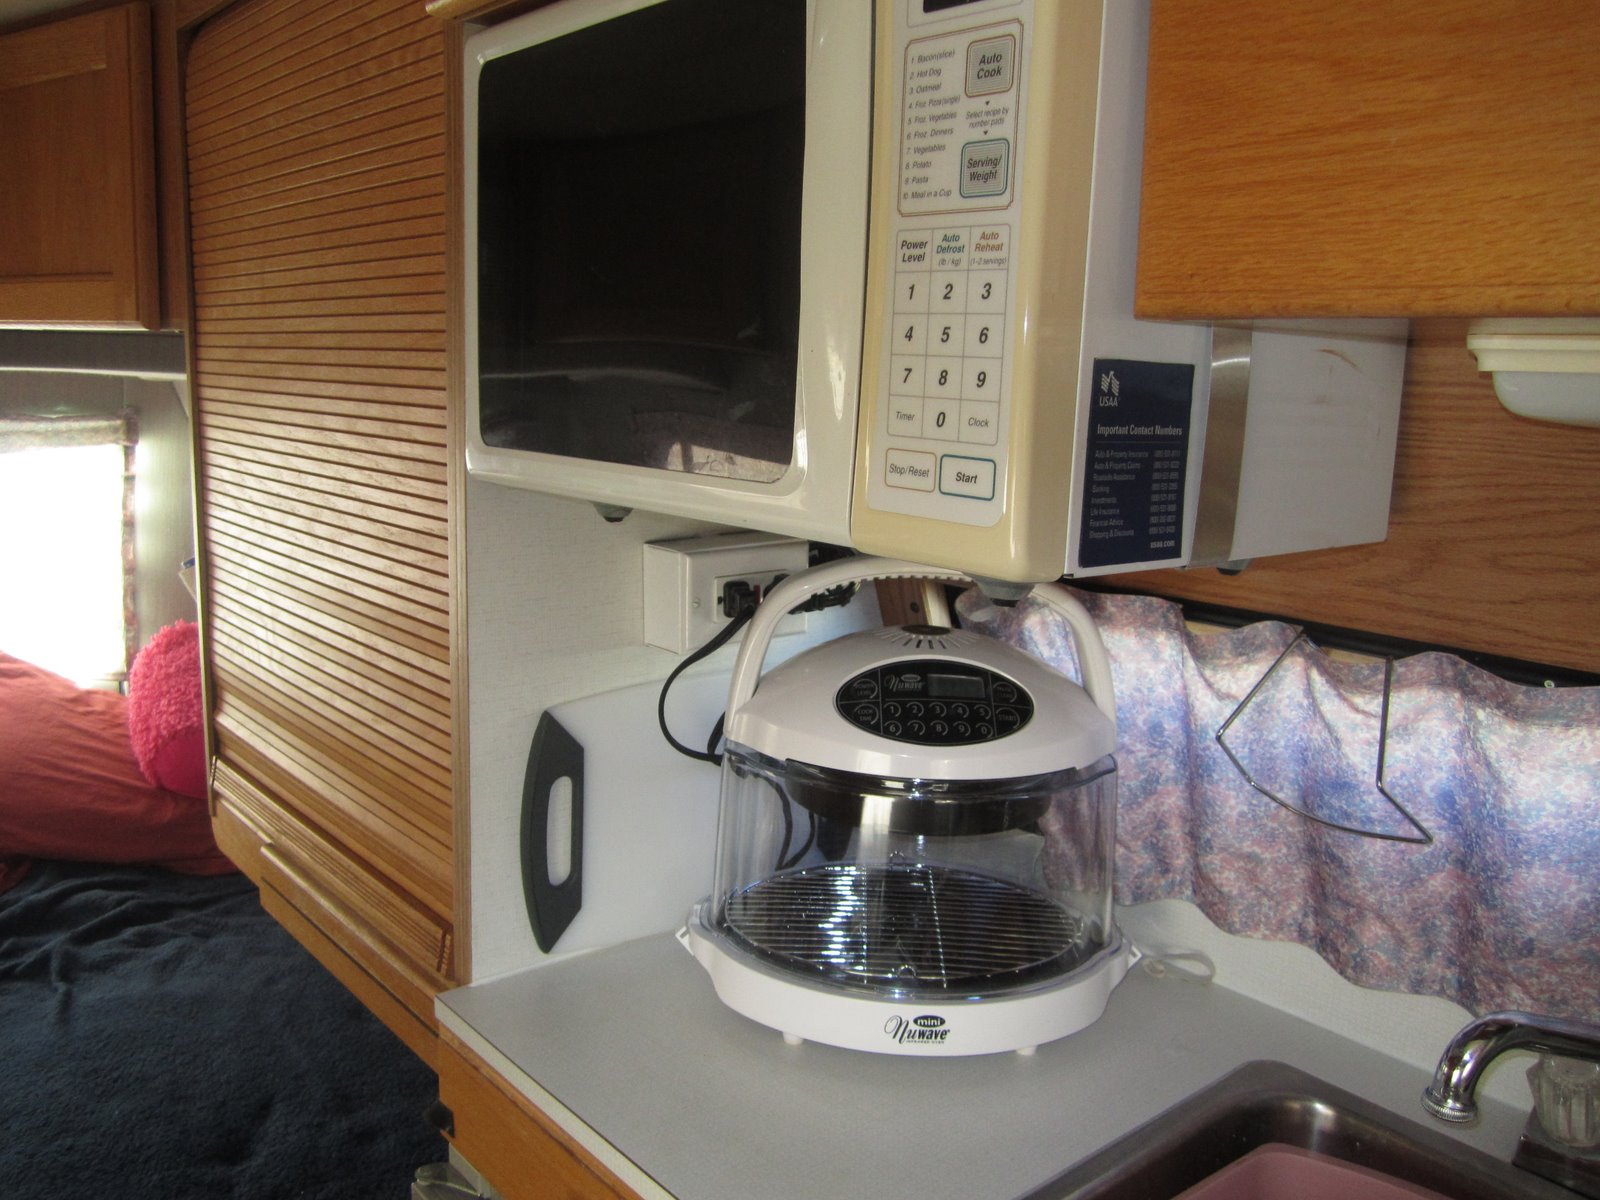
Two hooks and a shock cord now secure my oven when traveling.


And dowels that act as stops so stuff will quit slamming up against the sliding door and jamming it.


Little tabs on the kitchen drawers so they will stay closed underway...


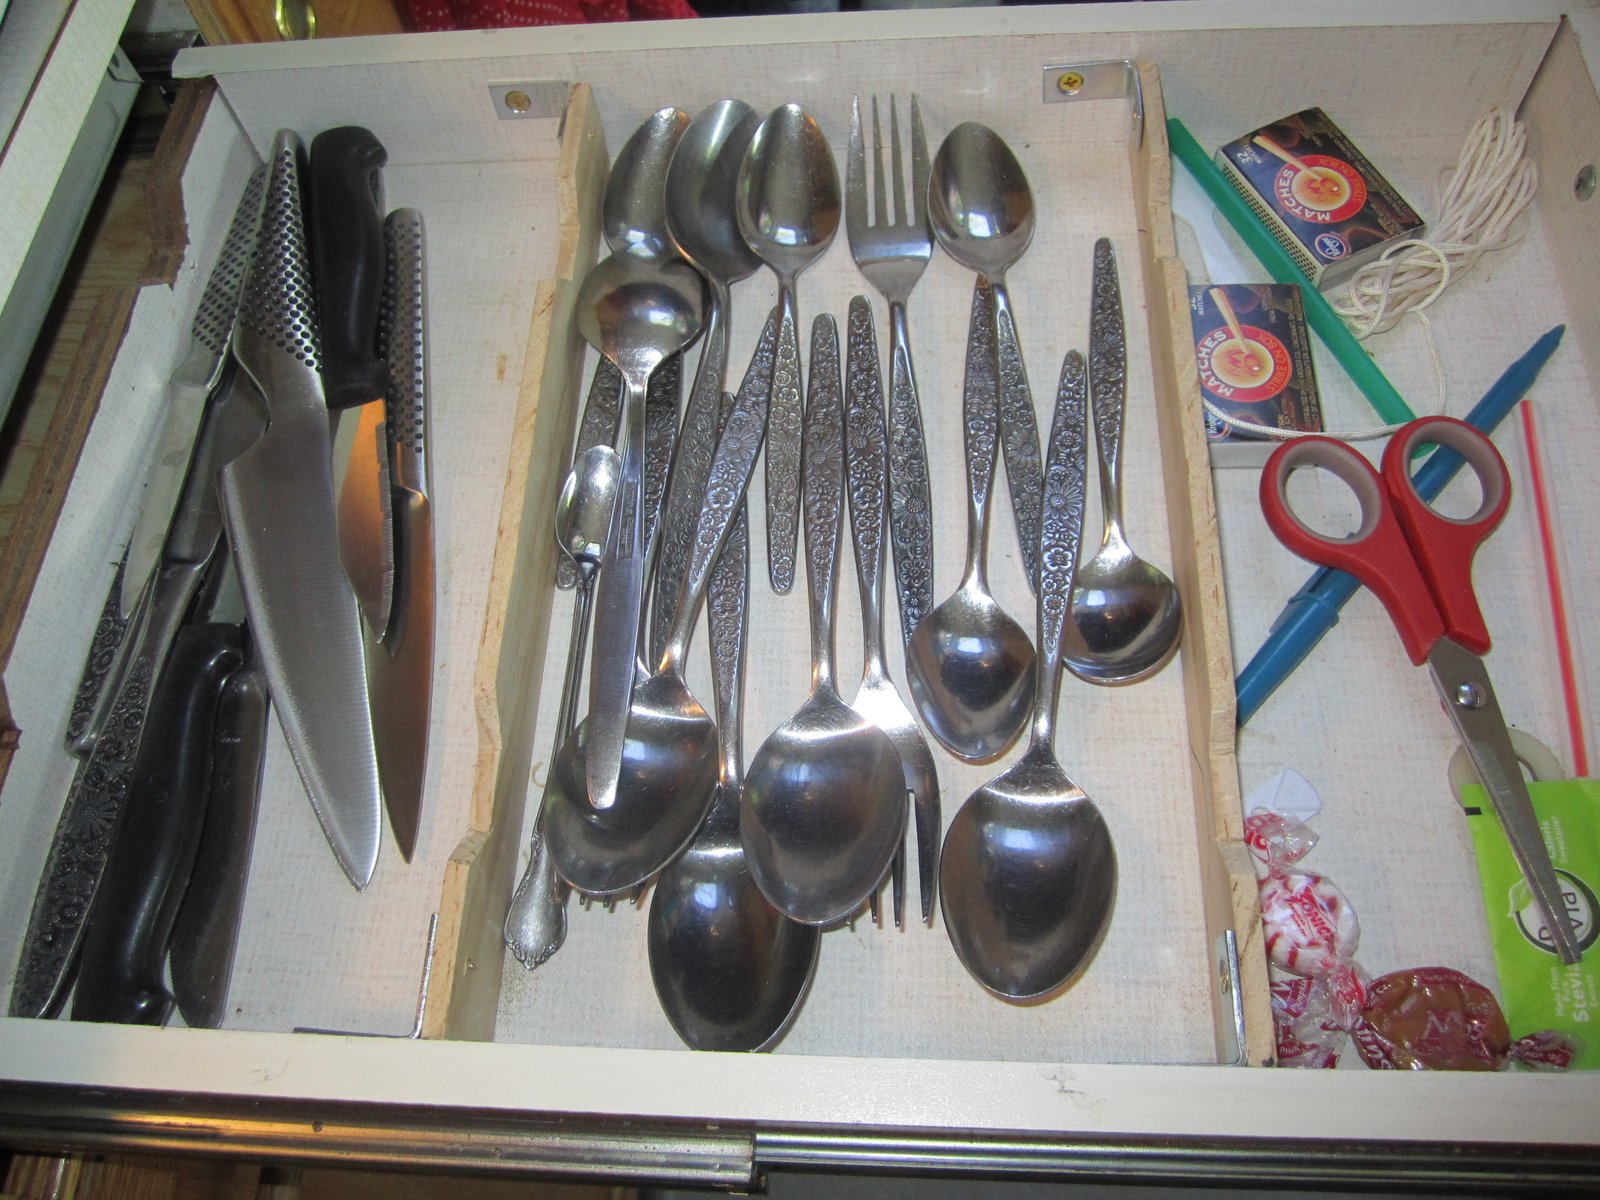
and dividers in the silverware drawer so everything doesn't rush to the back and jam the drawer whenever I make a corner on two wheels. Calm down, kids, I'm kidding.

Ron also updated and cleaned up my computer, checked the van motor and showed me how to better secure my bike.


And the 'crowning touch'...a new stove.  First Ron took the old one apart and tried his best to fix it but we found out they don't make those parts anymore.  So we had a new one rushed to us and it is a beauty.  Now I am back to gourmet cooking (Weenies and beans, boiling water, etc)--life is grand.

For all of this I thank all three of my kids who chipped in and helped Ron spend four days in North Carolina working on my want list. And especially to Ron, I am so grateful for all you have done to make this trip easier for me.  I really do hate to be one of those obnoxious bragging mothers but I have to say it...I have the greatest kids in the world!  Ron, Janice and Tom--you are the best!

Sunday, January 22, 2012

NuWave Oven

For Christmas, I got mom a NuWave Mini Oven. This is s smaller version of the oven she saw used by Mike and Diane Kelly at Thanksgiving. She has replaced the larger toaster oven that she used to have on board and has told me that so far this works great. It even makes toast.

It has a smaller footprint that the toaster oven. And it also doesn't leak as much heat. So it seems to be perfectly safe to use on board.

Merry Xmas mom! Enjoy.
~Ron

It takes up about half the small table.
She cooked some chicken breasts, carrots, and potatoes in it.
Fits nicely under the nuker.
Posted by Picasa

Thursday, June 30, 2011

Side door improvement

I found a very heavy front door mat at Ikea that works perfect. I store it on board on the middle of the galley where it functions as a door mat. Then when camped, it can simply be moved to the ground outside the side door. The nice thing is that it is both big enough, and heavy enough not to be blown away by any winds.


We also bought a step stool to help mom step in and out of the side of the RV. I built a mounting bracket on the rear side door to store it. That was dead space anyhow and it fits perfectly!

Rear Door Arrester

Fully extended
Ready to save the door!
Since the arrester in the rear door can't handle the weight of the new spare tire, I added a back up arrester. It is nothing but a rubber bungy cord. That way, if the wind catches the read door and the primary arrester fails, then this bungy should keep the door some slamming into the left side of the RV.

Cabinet shelves improved


I changed the shelves on the main cabinet. It was build to hold a CRT style television and a VCR. However, old CRT TV's take a lot of space and are no longer needed.

Since mom can watch movies and TV on her laptop, I changed the cabinet around. I added a shelf above the slide out. This gives her a ton of storage space for kitchen. She can store food, or a crock pot, or anything there. It almost doubles the kitchen storage.

I also added back stops to the shelves so that items stored will not catch the roller door.

The new bottom shelf, which is very narrow, holds the inverter. To the right of the inverter is a space for the laptop and it's power adaptor.

Bike rack added

Mom and I have been talking about her bringing her bicycle on her trip. We figure this would be very handy for a couple of important reasons. First, to save money. The RV doesn't get very good mileage around town running short errands. Second, if you are in a camp site, then every time you want to run to to the store, then you would have to disconnect everything, pack up everything, and the reconnect when you get back.

So the question is, where to put a bicycle? Halcyon II already has the spare tire hanging off the rear door. I had mounted my bike rack from my Volvo wagon on the spare tire in order to carry my mountain bike back to Tucson. However, that doesn't work very well. I covers up the beautiful tire cover that Janice made. It makes opening the read door troublesome because of all the straps. And it adds that much more weight to the rear door and the tire rack.

The roof is too high for a roof rack. How on earth would anyone get it off and on?

I considered getting a hitch mounted bike carrier. However, that would prevent you from opening the rear door. And they are expensive. And I would have to get a special one that sticks way out from the hitch in order to around the spare tire.

What I saw in Santa Barbara
When I was back in Santa Barbara I happened to run into an older Dodge camper van that had a home made front mounted bike rake. I really liked that idea. So I took a photo of it.

I scoured the internet looking for a front mounted bike rack. I could not find one. After trying all of my searching tricks I finally found a small farm tractor company in upstate New York that made one. I called them up and they told me that they no longer make it because front bike racks are now illegal in New York State.

So I made my own. I found a bike rack at REI for $16 that had the basic frame. Then I went to Lowes and bought the metal pieces, bolts, etc. I was able to mount a steel crossbar to the frame between the radiator and the grill. I bolted two metal tubes to the cross bar, through an opening in the grill, and bolt them to the REI bike rake. On the bottom I drilled holes through the REI rack and used long bolts to mount the bottom to the bumper's licence plate holes. I then mounted small holding arms to the rack and secured them with a plumbing clamp.

The whole rack sits snug against the front. I had to build it so it sits about 1 inch off the front so that the hood can open without catching on the rack. Because the van is so big, the bike rests below the hood and below the eyeline of the driver. This prevents the bike from blocking any of the view of the road. Also, the bike tires sit below the headlights. So it won't block any light from them.

All and all, I'm pretty happy with the results. It makes for a much more balanced RV (bike off the front, spare tire off the back). I can add a second set of arms from the REI rack to hold two bikes, if needed. If there is no bike, the arms can be swing to the side and out of the way.

Front View
Side view. Note that it is tilted slight forward on top. That is because it has to leave room to for the hood to open.

Wednesday, June 29, 2011

Janice makes an awesome tire cover

Janice hand made a tire cover for the RV. Here is a video of mom seeing it for the first time.


This was a secret project that took Janice a couple of months to make. I sent her the tire specs and she found a tire dealer in Salem that had that size tire in their showroom. She was able to measure it and test the cover as she made it. Mom didn't know about it until she saw it here for the first time.

Halcyon II's new tire cover
The cover is hand made and hand painted. It took Janice a while to find the exact right colors in in the right material. It is made from treated canvas used to make umbrellas. So it is designed to be outdoors and in the sun.

The colors are the exact same colors of the hull of the Halcyon. It was red below, with a white waterline, and dark blue above the water.

Saturday, June 25, 2011

Power Inverter


I installed a power inverter in the RV to power mom's laptop. It is permanently mounted in main cabinet, upside down under the new shelf. Because this cabinet was originally build as a media cabinet, it has two 12V DC cigarette lighter ports in the back to power the original TV and VCR. So I was able to plug this inverter to that 12V power source.

I did a lot of research on inverters. And I also asked some friends who have a lot of experience using inverters. The conclusion was clear. Do not buy an off-the-shelf inverter from Radio Shack, or any other consumer electronics store. Everyone I spoke too ended up with an AIMS Power inverter, and they have all been very happy with them.

AIMS Power is based out of Reno, Nevada. You can't buy directly from them. They recommend that I buy my inverter through their web retail channel The Inverter Store. I ended up buying their 400 Watt stand alone model. It was only $34, and with shipping $41.

This inverter doesn't come with mounting points. Since I was going to hang it upside down on a moving vehicle, double sided tape wasn't going to be good enough. So I ended up drilling 4 small screw holes into those lovely aluminum side fins and mounting it with screws through the top of the new shelf.

It is pretty quiet, and seems very well built. I ran some tests and and it powers Mom's Macbook Pro just fine. It also doesn't draw too much power off the house battery.

We will see how this works out. So far, so good!

Sunday, June 19, 2011

LPG Tank filler angle connector

There is a design flaw on the Roadtrek, or at least this model. The LPG tank is located under the driver's seat. There is a small door that opens up that allows you to get to the fill port, and the main LPG valve. The problem is that the fill port is slightly below a steel beam.

The reason this is a problem is that it makes it impossible to fill with a thick gas "wand" from a service station. The wand has to mate with the fill port straight on. But if the wand is over 1" thick, the beam prevents you from getting to the port at the correct angle.

In San Diego I drove from service station to service station trying to find one that could fill it. Finally I found a station that had a clever angle extender. The guy simply screwed the angle extender to the fill port, then attached the LPG fill want to the other end. Easy as can be.
Here is what his looked like:
What I saw...

I resolved to carry one of these angle connectors with me so I don't have this problem in the future. But it turned out to be impossible. RV stores never heard of of. LPG stores never heard of it. No one had a clue about what I was talking about.

I finally found a company out of Phoenix that understood what I needed. They shipped me the parts and I had to put it together myself. But that only took 5 minutes.

Here are the parts...
The parts I ordered


If you need to do this yourself, go to Propane Warehouse. Order the following parts:
  • 1 3/4 Female ACME x 3/4 Male Pipe (ME111)
  • 1 3/4 Male ACME x 3/4 Male Pipe (ME215)
  • 45 Degree High Pressure Steel Elbow 3/4 Female Pipe
  • Teflon Tape for Propane Gas
With shipping, the total was $106. Not cheap, but it sure beats not being able to fill your tank.

Elizabeth the GPS

I installed a Magellen RoadMate 1700 GPS that I picked up at Fry’s for $140. The cool thing about this GPS is that is has a huge screen (7 inch). And that is has an external video jack. I installed a backup camera next to the rear license plate. The camera is powered by the backup tail lights. The video signal is run up to the GPS unit.

When the van is put into reverse, the camera feeds the GPS, and the GPS screen switches to a nice color view of what is behind me. Nice! No more blind spot when backing up. It also makes parallel parking much easier!

I’ve named the GPS “Elizabeth” because of the voice is has programmed in it. It has a stern, humorless, female voice. I don’t know why the name Elizabeth came to me. But it did, and it stuck. Now Elizabeth tells me where to go.

Magellan no longer makes this model. In fact, they no longer make any models with a video input port. Nor, as far as I can tell, does any one else. Instead, they expect you to buy a new stereo system with integrated GPS and backup camera. So when Elizabeth dies, I don't know what I will do for a backup camera monitor.

External Spare Tire


I moved the spare tire from under the port berth to hanging from the rear door. But the problem is that Roadtrek no longer sells the Continental Kit. So I had to get one somewhere else. It proved to he harder than it should be. Trying to find a spare tire rack that fits on a full size Dodge van door is rare. I finally found a website for a company in Los Angeles.


Mounting the thing was an ordeal. It doesn’t look as nice as the original Roadtrek kit. But, that is all that is available. However, the quality was lacking. The bolts didn’t line up perfectly to the nuts that had been welded on. I ended up drilling out the nuts and installing the bolts backwards.


I finally got the damn thing on. I then bought some locking lug nuts so that no one can steal (well, easily steal) the spare tire.

Now, this adds a lot of weight to the rear door. In turned out to be more weight than the arrester can handle. A gust of wind caught the rear door, and the stop pin bent. The door was able to swing open almost 180 degrees. The rear tire slammed into the port rear corner of the van, putting a nice dent in there I took the van over to a friend who owns an autobody repair shop. He said that because the dent is on the corner, fixing it is going to be a big job, perhaps a few thousand to repair. So, the Halcyon II is going to have a little battle scar on her for her travels.

KItty Brig

With the door in place
View of how it was built.
Looking down into the brig.
You can see the new partition on the right.

I added a special place for Sime to hid, and to be locked up. I call it the Kitty Brig.
I moved the starboard rear speaker back, and rotated it 90 degrees. I converted the old speaker hole into the door way. I installed a partition into the storage area between the brig and the hot water heater. Then I added insulation to protect her from any heat from the hot water heater.
I then added a door that can be installed and locked on to keep her in there. It is held in place with a simple butterfly nut.